Here's the finished product of last years collage. The 3 month Christmas experience.
So getting back to this years project, I decided this year I would create my own Xmas Tree Decorations..
So the TrEnvy Australia Christmas Tree Dec Concept was born...on the 31st of October...yes Halloween...knowing that with only a month in which to design and create I had to get to it...
Halloween night the 31st of October I set the theme of upcoming Xmas with a little inspiration from Mother Earth and my son's Super Mario game along with the fathers day gift my wife and son had bought for me this year. I decided this year TrEnvy would have a Whimsical Christmas Tree.
Below is my original inspiration (pictures)
The Whimsical Mushroom Candles which were given to me for Fathers Day 2011.
The spotted woodland Mushroom, reminds me of not only Super Mario games from the 80's but the whimsical world of Alice in Wonderland & Charlie and the Chocolate Factory. There starts my design for a Whimsical TrEnvy Australia Christmas Tree.
I start on the 31st of October by making a flour clay...4 cups Flour, 2 cups Salt and 1/2 cup of cooking oil.
mix together and your ready to create, I of course have never tried flour clay before so it was a trial first..but it worked out perfectly the first time.
Here's a photo of the mixed flour clay, a great first attempt if I do say so myself.
Now to start the actual creations of my TrEnvy Australia Christmas Woodland Whimsical Mushrooms.
Next was to shape my little mushrooms, and having been bought up with my mother doing pottery for many years I think these things stick with you. so tops and base made separately then cooked in the oven for approx. 20min at 250 degrees...thank god it wasn't the middle of summer...you would die of heat exhaustion for sure...the first lot were a little burnt but not having made them before I was sure they would be ok. Here's some photos of my first batch of Mushrooms..
A little burnt but it was all good as I knew I was going to paint them...I suppose if you were after that rustic country charm then they would have been perfect left as is.
So after making a few batches in the next week it was time to trial painting them...red for the tops and white for the bases...more pictures below.
A first undercoat of the Mushrooms in red.
A slow process which took a couple of weeks to do..continuing on... coat after coat.
The bases got burnt..quite crispy and black, but I had all this under control...
In between all this daily life continues...ie: my day job, and then coming home to continue on..
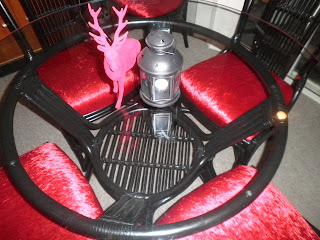
I also recovered our dining room suite for Christmas..like I didn't have enough to do..just a few pics to show you our new TrEnvy Christmas Dining Suite...Red Velvet...works wonders.
The finished suite...like I said, as if i didn't have enough to do..
So getting back to the mushrooms...next was the white bases..
After cooking all the bases to the mushrooms, I started hand painting them...this was the first hurdle I came across...a) the white paint wasn't covering the burnt base and b) it was soaking up the white way too much..so a trip to the hardware shop to buy some gloss white spray paint solve all my woes...the next day I made a spray box, lined my little bases up with the help of good old Blu Tak and they were ready to spray. 3 coats and 3 days later...(I like to give time for drying properly) wallah!
White gloss finished and now for the stippling of white dots on the tops of the mushrooms.
From this to......
This.......
Then to gloss the tops so they matched the gloss white bases...by this time we are almost at the end of the month of November...
Applied the first coat of gloss...not bad but needed a few more coats.
Well with the gloss completed...its time for the rest of the construction to continue...
Now it is time for a break, but I will be sure to continue the deconstruction of the TrEnvy Whimsical Tree Decorations. Hope you have enjoyed the first instalment.


No comments:
Post a Comment